This pattern is for a Head Halter for Dogs. Head halters are used when teaching a dog to heel. They are a type of training collar. Before using a head halter (or ANY training collar), please research the proper and safe way to use the training device. This particular head halter will be good for most dogs, but I wouldn’t recommend using it with a dog that is a HEAVY puller. It is deliberately lightweight and delicate, which makes it ideal for dogs that don’t feel comfortable in a traditional head halter like a Halti or a Gentle Leader. However, this also means that this particular head halter will likely not be well-suited for dogs that are very heavy pullers. Always do your own research and check with a local trainer to be sure you’re using your training collar correctly.
Materials Needed:
Muzzle (Nose) Loop
Begin with a slip stitch on your hook, leaving a tail that is approximately 12” long (we’ll use this later for sewing). Chain 2 and make a single crochet (SC) in the second chain from the hook.
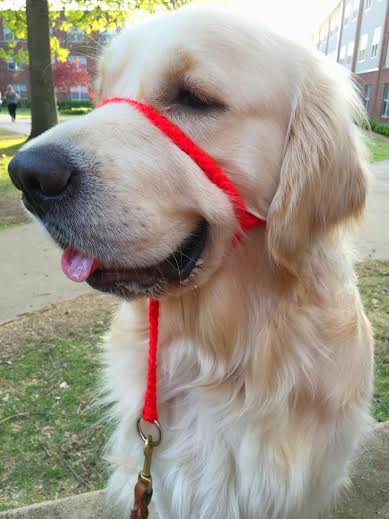
At the back of the stitch there is a horizontal bar. If you look at your stitch, it creates a “V”. Like an arrowhead, this “V” points to the horizontal bar. Turn your work so the bar is accessible to you and insert your hook from top to bottom. Work a single crochet. Look at your newly completed stitch. The “V” on this stitch now points to two horizontal bars. As before, insert your hook into the two loops and work a SC. All further stitches will follow this pattern. Turn your stitches to access the two horizontal bars, insert your hook, and work a SC. The horizontal bars (loops) may be a bit hard to get your hook into, so you may have to guide the loops over your hook with your finger. Continue this pattern until your work is long enough to fit comfortably around your dog’s muzzle and has enough length left over to create two “straps”. One strap will be a safety strap and it will connect to your dog’s regular collar in case of emergency or in case of equipment failure. The other strap will be the strap with the “O” ring, and this will be the main strap that you’ll connect the leash to. To determine if your work is long enough, fold your work (cord) in half and place your loop on your dog’s muzzle. Pinch the straps together under your dog’s chin. Each strap under your dog’s chin should be approximately 6”. The length of these straps will depend on the size of your dog. I used 6” for the length of each strap for my Labrador Retriever. The strap for my Golden Retriever’s halter is about 8”. My Golden’s head halter was a prototype and only has one strap, which is what you’ll see in the pictures.
Keep in mind that the cord you’re creating will have a little bit of give and will loosen a little bit after it’s broken-in. If you make the muzzle loop too loose, the head halter won’t fit properly and may be loose enough for your dog to remove it. If you make it too tight, your halter either won’t fit or will be uncomfortable for your dog. Unfortunately, there is a little bit of guesswork involved with this. For reference, my dog’s muzzle is 11” at the widest part (up near the eyes) and I made 23” of cord.
Put the cord around your dog’s muzzle with the two straps hanging down under your dog’s chin. Make the strands equal and then pinch the straps together under your dog’s chin. Safety pin the straps together. Check out the attached photos to see how the head halter should fit. Remove the muzzle loop from your dog’s nose with the straps pinned together. Now put the muzzle loop back on your dog’s nose. Examine the fit of the muzzle loop on your dog. The loop should fit snugly around your dog’s muzzle, similarly to a Halti or Gentle Leader. Your dog should be able to pant, yawn, eat, take treats, and drink water with the muzzle loop on. This loop isn’t adjustable so make sure that the fit is just right! When you’re confident that the muzzle loop fits your dog well, sew the straps together. Thread your needle with the same yarn that you’ve been using and SECURELY sew the two straps together where your pin was.
To attach the “O” ring and clasp:
Thread the needle with the tail of your work. On one end of your cord, slide the threaded tail and some of your cord through the “O” ring. Pull about 1” of your cord through the ring and fold it up and back onto your cord so that it secures the ring. Using the tail and needle that we threaded earlier, sew the cords together so that the “O” ring is SECURELY fastened. Weave in your ends on the inside of your work and fasten off.
Follow the same steps on the opposite end of your cord to attach the clasp.
Attaching the neck strap
This part is a bit tricky to explain, so please use the photos I’ve attached as a reference.
The neck strap is the part of the head halter that will go underneath your dog’s ears and behind the dog’s head, keeping the halter in place. The neck strap will be attached to both sides of the muzzle loop. When your dog is wearing the head halter, the neck strap should sit high up on the dog’s neck, near the base of the skull. The points where the neck strap is connected to the muzzle loop should be below your dog’s eyes but above your dog’s mouth.
Put the muzzle loop on your dog’s muzzle. Using the attached pictures for reference, and with the above description in mind, place stitch markers on either side of the muzzle loop where you want to connect the neck strap. Once you’re satisfied with the position of your stitch markers, remove the muzzle loop. Hold your muzzle loop up on one of your fingers and then pull the straps downward so that your loop is equal in length on both sides. More likely than not, your stitch markers will not be perfectly even or symmetrical at this point. The goal is to get the number of stitches between the “top” of the muzzle loop and the stitch marker to be the same on each side of the muzzle loop. When you look at the muzzle loop, you want your stitch markers to line up equally. To even it out, I simply moved a stitch marker up on one side of the loop, and then moved the other stitch marker down on the other side of the loop. You may have to move the stitch markers around a bit to get them even. While it isn’t 100% necessary to have the neck strap connected to the muzzle loop evenly on either side, it will improve the fit and comfort of the head halter.
Now that you’ve evened out your stitch markers, place the muzzle loop on your dog’s muzzle once more. Check the fit. Be sure that the neck strap will fit on your dog comfortably and correctly. If you’re unsure, check out the photos I’ve attached. This should help you determine whether or not your neck strap placement is correct.
Following the instructions from the beginning of this pattern, create a new cord. The cord needs to be long enough to fit around the back of your dog’s head and attach to the muzzle loop on both sides. There also needs to be enough extra cord available to sew to the muzzle loop. Check the length as you go by placing the end of the cord up to your stitch marker on one side of the muzzle loop, and wrapping the rest of your cord around the back of your dog’s head (underneath the ears). Ideally, the neck strap should be somewhat tight so that the strap sits high up on your dog’s neck and keeps the halter in place. Again, we’re working with yarn, so remember that the strap will stretch and also loosen a bit with use. Try to find a happy medium. Not too tight, not too loose.
When you’re happy with the fit of your neck strap, thread your darning needle with the yarn you’ve been using, and SECURELY sew the neck strap to the muzzle loop where your stitch markers are. After you’ve sewn one side, make sure you untwist your neck strap before sewing the other side. Weave in all your loose ends.
Woohoo! You’re done!
Congratulations! Go try out your new head halter!
Does your head halter fit your dog similarly to the fit depicted in the reference pictures?
Will this become a new favorite piece of equipment for you and your dog?
Remember, training collars are not a substitute for training your dog. Use training collars wisely. Make sure they are a resource, not a crutch, and ALWAYS use them safely.
Feel free to share my pattern! If you have comments, questions, or suggestions, let me know. Please DO NOT use my pattern to make items to sell. This is an original pattern. Thank you!
Materials Needed:
- US Size F/3.75 MM Crochet Hook
- Yarn of choice
- 1 “O” ring
- 1 Clasp (I used a bolt snap AKA snap hook)
- Stitch markers
- Safety pins
- Darning needle
Muzzle (Nose) Loop
Begin with a slip stitch on your hook, leaving a tail that is approximately 12” long (we’ll use this later for sewing). Chain 2 and make a single crochet (SC) in the second chain from the hook.
At the back of the stitch there is a horizontal bar. If you look at your stitch, it creates a “V”. Like an arrowhead, this “V” points to the horizontal bar. Turn your work so the bar is accessible to you and insert your hook from top to bottom. Work a single crochet. Look at your newly completed stitch. The “V” on this stitch now points to two horizontal bars. As before, insert your hook into the two loops and work a SC. All further stitches will follow this pattern. Turn your stitches to access the two horizontal bars, insert your hook, and work a SC. The horizontal bars (loops) may be a bit hard to get your hook into, so you may have to guide the loops over your hook with your finger. Continue this pattern until your work is long enough to fit comfortably around your dog’s muzzle and has enough length left over to create two “straps”. One strap will be a safety strap and it will connect to your dog’s regular collar in case of emergency or in case of equipment failure. The other strap will be the strap with the “O” ring, and this will be the main strap that you’ll connect the leash to. To determine if your work is long enough, fold your work (cord) in half and place your loop on your dog’s muzzle. Pinch the straps together under your dog’s chin. Each strap under your dog’s chin should be approximately 6”. The length of these straps will depend on the size of your dog. I used 6” for the length of each strap for my Labrador Retriever. The strap for my Golden Retriever’s halter is about 8”. My Golden’s head halter was a prototype and only has one strap, which is what you’ll see in the pictures.
Keep in mind that the cord you’re creating will have a little bit of give and will loosen a little bit after it’s broken-in. If you make the muzzle loop too loose, the head halter won’t fit properly and may be loose enough for your dog to remove it. If you make it too tight, your halter either won’t fit or will be uncomfortable for your dog. Unfortunately, there is a little bit of guesswork involved with this. For reference, my dog’s muzzle is 11” at the widest part (up near the eyes) and I made 23” of cord.
Put the cord around your dog’s muzzle with the two straps hanging down under your dog’s chin. Make the strands equal and then pinch the straps together under your dog’s chin. Safety pin the straps together. Check out the attached photos to see how the head halter should fit. Remove the muzzle loop from your dog’s nose with the straps pinned together. Now put the muzzle loop back on your dog’s nose. Examine the fit of the muzzle loop on your dog. The loop should fit snugly around your dog’s muzzle, similarly to a Halti or Gentle Leader. Your dog should be able to pant, yawn, eat, take treats, and drink water with the muzzle loop on. This loop isn’t adjustable so make sure that the fit is just right! When you’re confident that the muzzle loop fits your dog well, sew the straps together. Thread your needle with the same yarn that you’ve been using and SECURELY sew the two straps together where your pin was.
To attach the “O” ring and clasp:
Thread the needle with the tail of your work. On one end of your cord, slide the threaded tail and some of your cord through the “O” ring. Pull about 1” of your cord through the ring and fold it up and back onto your cord so that it secures the ring. Using the tail and needle that we threaded earlier, sew the cords together so that the “O” ring is SECURELY fastened. Weave in your ends on the inside of your work and fasten off.
Follow the same steps on the opposite end of your cord to attach the clasp.
Attaching the neck strap
This part is a bit tricky to explain, so please use the photos I’ve attached as a reference.
The neck strap is the part of the head halter that will go underneath your dog’s ears and behind the dog’s head, keeping the halter in place. The neck strap will be attached to both sides of the muzzle loop. When your dog is wearing the head halter, the neck strap should sit high up on the dog’s neck, near the base of the skull. The points where the neck strap is connected to the muzzle loop should be below your dog’s eyes but above your dog’s mouth.
Put the muzzle loop on your dog’s muzzle. Using the attached pictures for reference, and with the above description in mind, place stitch markers on either side of the muzzle loop where you want to connect the neck strap. Once you’re satisfied with the position of your stitch markers, remove the muzzle loop. Hold your muzzle loop up on one of your fingers and then pull the straps downward so that your loop is equal in length on both sides. More likely than not, your stitch markers will not be perfectly even or symmetrical at this point. The goal is to get the number of stitches between the “top” of the muzzle loop and the stitch marker to be the same on each side of the muzzle loop. When you look at the muzzle loop, you want your stitch markers to line up equally. To even it out, I simply moved a stitch marker up on one side of the loop, and then moved the other stitch marker down on the other side of the loop. You may have to move the stitch markers around a bit to get them even. While it isn’t 100% necessary to have the neck strap connected to the muzzle loop evenly on either side, it will improve the fit and comfort of the head halter.
Now that you’ve evened out your stitch markers, place the muzzle loop on your dog’s muzzle once more. Check the fit. Be sure that the neck strap will fit on your dog comfortably and correctly. If you’re unsure, check out the photos I’ve attached. This should help you determine whether or not your neck strap placement is correct.
Following the instructions from the beginning of this pattern, create a new cord. The cord needs to be long enough to fit around the back of your dog’s head and attach to the muzzle loop on both sides. There also needs to be enough extra cord available to sew to the muzzle loop. Check the length as you go by placing the end of the cord up to your stitch marker on one side of the muzzle loop, and wrapping the rest of your cord around the back of your dog’s head (underneath the ears). Ideally, the neck strap should be somewhat tight so that the strap sits high up on your dog’s neck and keeps the halter in place. Again, we’re working with yarn, so remember that the strap will stretch and also loosen a bit with use. Try to find a happy medium. Not too tight, not too loose.
When you’re happy with the fit of your neck strap, thread your darning needle with the yarn you’ve been using, and SECURELY sew the neck strap to the muzzle loop where your stitch markers are. After you’ve sewn one side, make sure you untwist your neck strap before sewing the other side. Weave in all your loose ends.
Woohoo! You’re done!
Congratulations! Go try out your new head halter!
Does your head halter fit your dog similarly to the fit depicted in the reference pictures?
Will this become a new favorite piece of equipment for you and your dog?
Remember, training collars are not a substitute for training your dog. Use training collars wisely. Make sure they are a resource, not a crutch, and ALWAYS use them safely.
Feel free to share my pattern! If you have comments, questions, or suggestions, let me know. Please DO NOT use my pattern to make items to sell. This is an original pattern. Thank you!

 RSS Feed
